• IP addresses are NOT logged in this forum so there's no point asking. Please note that this forum is full of homophobes, racists, lunatics, schizophrenics & absolute nut jobs with a smattering of geniuses, Chinese chauvinists, Moderate Muslims and last but not least a couple of "know-it-alls" constantly sprouting their dubious wisdom. If you believe that content generated by unsavory characters might cause you offense PLEASE LEAVE NOW! Sammyboy Admin and Staff are not responsible for your hurt feelings should you choose to read any of the content here.

    The OTHER forum is HERE so please stop asking.

My Favourite Recipes & Supermarket Food Products : Instead of eating out, why not try these recipes / food products at home

edmwrefugee

Alfrescian
Loyal
Table for 2.... or more: Mrs NgSK's Butter Cake
wendyinkk.blogspot.com

This is a side piece, not the middle, but it's sooooooo flat.

I don’t know about you. But I used to hate how short my butter cakes are.

Well, maybe I want value for money. Butter is not cheap, hence I want a BIG cake for the block of butter, LOL.

I’ve tried using methods to make a big cake w/o using more butter like adding lots of liquid, then flour, but results have always been not favourable. Cracks and huge ones. Tried egg separation method, but still not really like as big as I would like it. Actually I don’t really mind the cracks on butter cakes. But I’d just like to try making one cake, just that one cake that doesn’t crack. I only want to dispel the jinx in me. Whether it’s due to me or the recipe.


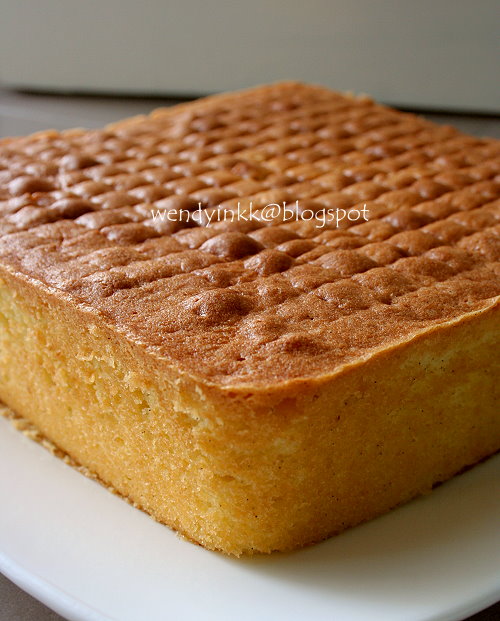
I am always in awe of Mrs Ng’s butter cakes, big (9X16) but no cracks. I was wondering, did she mix half margarine or is it full butter or what… Because when I make such cakes with margarine (back when I was still in my teens) they don’t crack. So, one day I mustered up my courage and asked her for her recipe of which she gladly gave me verbally. The original recipe is 250gm butter, but Mrs Ng told me, she tried reducing to 230gm and it was fine. So, I followed suit. And mine indeed turned out tall, fluffy and no cracks!

So now I know, I’m not jinxed with cracked buttercakes. It’s the recipe, not me, LOL!

FYI, Mrs Ng is a fellow church friend in Kampar Wesley. She always bakes for church events.


Mrs NgSK's Vanilla Butter Cake
Recipe source: Mrs Ng SK
Method by WendyinKK

230gm butter (salted), softened (cool at 18-20C, not glossy)
200gm eggs, no shell (4 grade B eggs)
50gm + 150gm sugar
200gm self raising flour, sifted.
60ml milk
1 vanilla bean, seeds scraped (or 1 tsp vanilla extract)

1. Preheat oven at 180C (conventional). (I only use 170C). Prepare a 8 inch square pan. Line the base and grease the sides (greasing helps the cake’s sides to rise well)
2. Separate the eggs, and place the whites into a medium sized bowl (6 cup capacity)Beat egg whites until soft peaks, gradually add 50gm sugar and beat until stiff. Set aside.
3. Cream butter and 150gm sugar until pale and fluffy (KA speed 2-4 ). Put in vanilla seeds and and beat for a while. Put in egg yolks one by one and beat well after each addition.
4. Put in half the flour and mix on low speed until incorporated. Put in milk in 2 additions and mix until well incorporated. Mix in balance of flour.
5. Put half the egg whites in and mix on low speed. Pour the balance of egg whites in and FOLD.
6. Pour batter into pan and level.
7. Bake for 45 minutes or until skewer comes out clean. (I reduced to 150C for the last 15 minutes because the top seems to be getting dark)

*Note: I did step 2 and 3 simultaneously. Butter in the stand mixer and egg whites with the hand mixer.

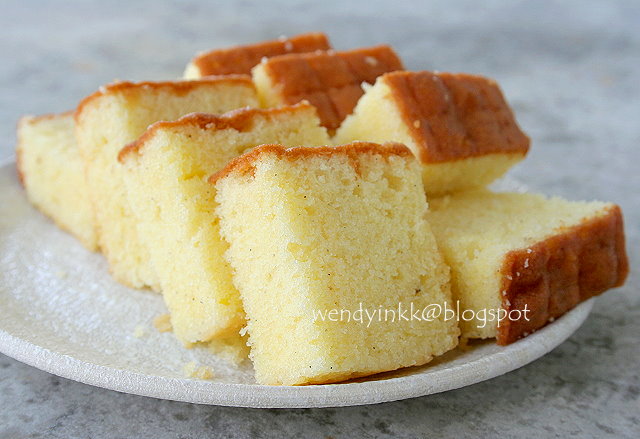
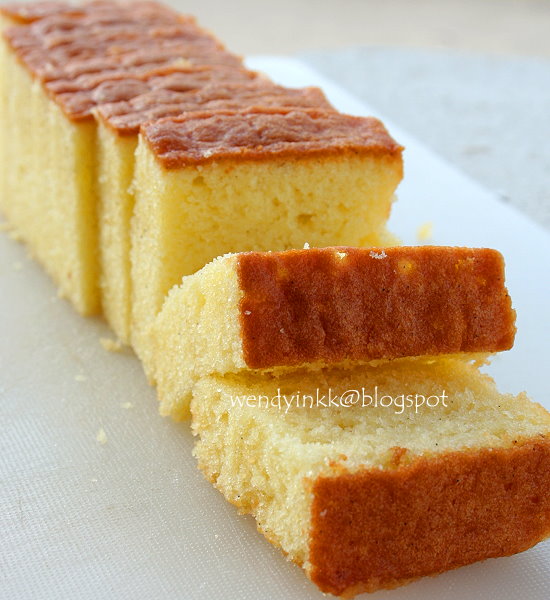
And when the cake came out of the oven, my jaw dropped. I did not only get a non cracked butter cake, I got a FLAT cake. OMG OMG! This is double bonus! Fluffy and soft!

Lesson of the day is, don't be stingy with butter.
Yes, I've learnt my lesson.
Mrs Ng, Thank you so so so much

For those of you who wish to try this cake and blog about it, please credit Mrs NgSK as the original owner, that is if you've used it as it is, or adapted it to your liking. It's her recipe, not mine.
But then again, there are a lot of similiar recipes out there, I won't know. It's just a matter of conscience.


edmwrefugee

Alfrescian
Loyal
Peach Gum Dessert Soup (桃胶糖水) – My Wok Life
www.mywoklife.com

FB96BCB4-639A-4542-8F25-0698862B5A84

Peach Gum Dessert Soup (桃胶糖水)​

ABC5B03B-54D2-40B7-BC1E-99936727529E.png
Peach Gum not only making the soup look more beautiful, it’s definitely heathy and full of nutritional goodness.

What is Peach Gum?

Peach gum is a natural resin secreted from the peach tree, formed in amber like crystals on the tree. Peach gum is pure plant base, it has soft & silky consistency, and will turn pale & translucent with long cooking.

What so great about having Peach Gum?

Not only consuming bird nest or fish maw help us to achieve better and more elastic skin & complexion, this peach gum (or peach resin) does the same with its richness in collagen, amino acid and fiber, and more. Peach gum also helps to achieve better digestive and cardiovascular systems. The best part is, peach gum is less expensive to consume regularly.

Similarly, there are different grades of peach gum. Try getting those with less impurities for better quality. Having said that, some black colored impurities are to be expected no matter what. Simply soak the peach gum in clear water for at least 5 hours, or overnight, to remove any black impurities. Also expect the peach gum to expand and soften.

Weather is getting hotter now, quick cook this to nourish yourself!

什么是桃胶?
桃树胶是从桃树中分泌出来的天然树脂,在树上形成琥珀色结晶。桃胶为纯植物,在长时间烹饪后具柔软丝滑的口感,并且会变得晶莹剔透。
食用桃胶的功效?
不仅仅是燕窝或鱼鳔能帮助我们达到更好,更有弹性的皮肤和肤色,这种桃树胶(或称为桃树脂)也具有同等或更高的效果。桃胶富有胶原蛋白,氨基酸和纤维。它也有助于提高消化和心血管系统的功能。最好的是,比燕窝花胶,桃胶是大部分人都能频密消费得起的。
同样的,桃胶也有不同等级的。越好的品质就有更少的杂质,但还是会有的。只需将桃胶浸泡在清水中至少5小时或过夜,即可去除任何黑点般的杂质。桃胶在浸泡后也会膨胀和软化的。
现在天气越来越热,不妨烹饪这个甜汤来滋润一下吧!

B0954C07-4770-4DC3-ADBC-D1115DE5B561.png

It’s just so simple to stay health and pretty.

Serves 5-6
Ingredients
2 tablespoons of peach gum
1 tablespoon each of sweet and bitter apricot kernels
1 – 2 tablespoons of dried longan
1 ear of snow fungus (dried usually)
2 large red dates
1/2 green papaya, peeled, deseed and diced
1 large lump of honey rock sugar
供5-6份
材料
2汤匙 桃胶
各1汤匙 南北杏
1 – 2汤匙 龙眼干
1朵 雪耳(通常晒干)
2个 大红枣
1/2青木瓜,去皮,去籽和切块
1大块 蜂蜜冰糖

Method:
(1) Soak peach gum and snow fungus for at least 5 hours, or overnight, until they are softened and plumped up in size. Drain and trim away impurities. Cut snow fungus into smaller florets.
(2) Boil a large pot of water over high heat. Add in all ingredients, except for papaya and rock sugar. Bring it to a boil again. Reduce fire to low, and simmer for 45min.
(3) Add papaya and rock sugar, continue to simmer for another 15min. Heat off. Serve hot or chilled.
做法:
(1)将桃胶和雪耳浸泡至少5小时或过夜,直至软化并膨胀为止。沥干并除去杂质。将雪耳剪成小瓣。
(2)将一锅水煮沸。除木瓜和冰糖之外,加入所有材料。再次煮沸后,改小火,煮45分钟。
(3)加入木瓜和冰糖,继续煮15分钟。熄火,上桌。热冷均可。


44DAD65F-FE89-4F8C-A1D8-444184BE8127.png

1 bowl of my snow fungus, papaya and peach gum sweet soup counts about 120kcal.
1碗雪耳木瓜桃糖甜汤约120卡路里。


Tips: Adding of sweet sand bitter apricot kernels is a personal choice as I like the crunch adding to these soft gluey ingredients. These nutty goodness also helps to nourish lungs and heal coughing.
温馨小贴士:加入南杏北杏是个人选择,因为我喜欢在这些软胶口感里也能够尝到脆脆的效果。南北杏仁能养肺止咳的功效更不在话下了。
 

edmwrefugee

Alfrescian
Loyal
eatwhattonight.com

Spring Onion Braised Fish 葱烧鱼

January 22, 2017
Spring Onion Braised Fish_4


Sorry for the long wait as a few people has been asking for the recipe for this. In fact, this is one of the dishes that my family will have on the reunion table every year. A simple braised fish that’s made fragrant with spring onion and dark soya sauce. Plain as it may seem, but it tastes delicious because it’s a dish that’s being brought down many years throughout every reunion.

Spring Onion Braised Fish_2


And we are down to the last week before CNY. Has everyone started to list down your CNY reunion menu ? It will be a super long weekend for everyone this year with eve falling on Friday going through all the way till Monday. Although CNY is less of a significance for me in recent years, but still it’s a new year after all. So I also hope that everything can begin on a good note in the new year.

Spring Onion Braised Fish_1


With supermarkets being brought down by long paying queues and crowds, so what’s better than not to order your fresh groceries online from PurelyFresh and have them deliver right to your doorstep conveniently ?

Spring Onion Braised Fish_5


Happy Lunar New Year in advance to all ! And hope I do have time to churn out another recipe and posting before CNY too. Enjoy !!

Spring Onion Braised Fish_3

Spring Onion Braised Fish 葱烧鱼
Spring-Onion-Braised-Fish_2.jpg
  • 1 pomfret
  • 5 stalks spring onion + more for garnishing, cut into sections
  • 2 tbsp ginger, shredded
  • 2 tbsp cooking oil

  • For the Seasonings:
  • 1½ light soya sauce
  • 1½ dark soya sauce
  • 2 tbsp shaoxing wine
  • 1 tbsp vinegar
  • 1 tsp sugar

  • For Garnishing:
  • some spring onions
  • some wolfberries
  • 400ml water
  1. Make a few slits on both sides of the fish.
  2. Heat up 2 tbsp of cooking oil in a pan and pan fried the fish on both sides until lightly browned.
  3. Add in the spring onion and shredded ginger.
  4. Add in the water and all the rest of the seasonings ingredients.
  5. Allow the fish to be braised on medium high heat, turning it over occasionally to allow the sauce to be coated evenly.
  6. When the sauce is very much reduced and thickened, off the flame.
  7. Garnish with spring onion and wolfberries and serve immediately.
 

edmwrefugee

Alfrescian
Loyal
eatwhattonight.com

Spicy Eggplants with Dried Shrimps 辣炒虾米茄子

June 28, 2017


What a heavy day today, knowing that I had to farewell an old time colleague a second time. The industry that I am working in is pretty niche, hence I was quite glad to know that an ex colleague was in the company that I just joined. But else, having joined for slightly more than 2 months, this old time colleague is going to leave again. Although I much knew people come and people go, but still knowing good old colleagues leaving is never a good feeling, especially the ones whom you can worked with.


Maybe as one grows older with friends getting lesser, and with the corporate scene that we are surviving in being more political than anything else, nothing beats true blue working relationship with people whom we can relate to. So when any of such people packed off suddenly, the motivation starts to dip.


But reality is such that I have to accept, whether I like it or not. So what I can do to make myself feel better is none other than therapeutic cooking. The moment I came back home, I start to get my woks working and indeed, the soul feels comforted immediately and so much so that I wanna blog as well.


Coming back to the dish, I know many people detest eating eggplants which I never used to fancy too. But ever since I have had this dish with Teochew mui or congee at the stalls, I start to have a liking for them. Especially when they are cooked with minced meat which you can find the recipe here, or this variation, which is cooked with spice and dried shrimps.


Eggplants tend to turn black easily when they are cut due to oxidisation with the air, similar to that when we cut apples. So to prevent this from happening, I blanch them in hot cooking oil with the purple sides drenched in the hot oil. This helps to retain the bright purplish colour of the eggplants and retains its texture too when they are stir fried later on.

This simple home-cooked is a brilliant fit with plain congee and I really love how the spice and fragrance of the dried shrimps come together with the tender eggplants.


It’s mid week today which makes it another 2 days before TGIF. So everyone including myself, hang on there ! In the meantime, enjoy this dish !! And do follow @eatwhattonight on Instagram for more daily updates !!
Get your fresh groceries and other cooking supplies from PurelyFresh online today !!

Spicy Eggplants with Dried Shrimps 辣炒虾米茄子

Spicy-Dried-Shrimps-Eggplants_1.jpg
  • 1 egg plant, cut into sections
  • 1 tsp minced garlic
  • 2 tbsp dried shrimps, soaked in some water till soft and minced
  • 1 tbsp spicy bean paste (辣豆瓣酱)
  • 3 tbsp water
  • 1 tsp sugar
  • 1 chilli padi, diced
  • some cooking oil
  • some diced spring onion, for garnishing
  1. Heat up some cooking oil in a pot till hot and blanch the eggplants with the purple sides in the oil. When the white sides of the eggplants start to turn slightly brownish, remove from flame and drain the eggplants well on paper towels.
  2. In a wok, heat up 1 tbsp of cooking oil and stir fried the garlic, dried shrimps and chilli padi till fragrant.
  3. Add in the spicy bean paste, water and sugar and mix well.
  4. When the sauce starts to sizzle, add in the eggplants from Step 1. Stir to mix well and off the flame.
  5. Garnish with diced spring onion and serve hot with congee or rice.
 

edmwrefugee

Alfrescian
Loyal

BBC Food : https://www.bbc.co.uk/food/recipes/roastpotatoes_92811

Perfect roast potatoes


Perfect roast potatoes

Preparation timl :Less than 30 mins
Cooking time : 30 mins to 1 hour
Serves: Serves 8

Fluffy inside, crunchy outside, these roast potatoes are a perfect sidekick to any roast dinner. (They're even better the next day, eaten straight from the fridge!)

Each serving provides 389 kcal, 7g protein, 65g carbohydrates (of which 3g sugars), 9.5g fat (of which 4g saturates), 7g fibre and 0.3g salt.

Ingredients​

  • 3 tbsp vegetable oil, beef dripping, or duck fat
  • 16 Maris Piper or King Edward potatoes (each about 175g/6oz), cut into quarters or large chunks
  • sea salt

Method​

  1. Preheat the oven to 200C/180C Fan/Gas 6.
  2. Put the potatoes into a pan and just cover with water. Add a tablespoon of salt, cover with a lid, and bring to the boil. Boil for 15 minutes, until cooked (they will slide off when pierced with a knife). Drain thoroughly in a colander, then set the colander on top of the cooking pan and cover the potatoes with a tea towel. Set aside for 10 minutes to steam dry.
  3. Meanwhile, put the vegetable oil, dripping, or duck fat into a roasting tin and heat in the oven for 10 minutes.
  4. Gently toss the potatoes around a little in the colander. Tip the potatoes into the tin of hot fat and give it a shake to spread the potatoes out in the pan, but don't worry about turning them. Put the tin into the oven and roast for 20 minutes. At this point give the potatoes a turn and then return them to the oven for a further 20-30 minutes or until golden and crunchy. Season the potatoes with salt and pepper and serve.

Recipe Tips​

You can make roast potatoes ahead and reheat them for a stress-free roast dinner. Parboil the potatoes as above, but allow the drained, bashed potatoes to cool slightly. Toss them in the duck fat so that the potatoes are as evenly coated as possible. Then spread them out on one or two trays so the potatoes are not touching each other. When completely cold, freeze the potatoes on their trays. (After they are frozen you can transfer them to a freezer bag.) Cook the frozen potatoes at the same temperature in a dry roasting tin, adding another 15 minutes to the cooking time.
 

edmwrefugee

Alfrescian
Loyal
Easy stir-fried bee tai mak (老鼠粉) with chicken and oyster mushrooms
thedomesticgoddesswannabe.com

Bee tai mak is one of those noodles that brings me way back to my childhood.
When we were kids, we would have bee tai mak soup when we we sick. I guess this was largely because they are easy for kids to eat since all one needs is a big spoon. I really enjoyed slurping the noodles and it was the one thing I would eat whenever I had a sore throat, and I seem to get that a lot when I was small.

IMG_1406

When I grew older, my mom would stir-fry the bee tai mak. I discovered that bee tai mak cooked this way was even more delicious than the soup version.

When I got married, I cooked this for the LAM. The first time he saw this, I think our conversation went something like this:

LAM: What is this?
Me: Bee Tai Mak.
LAM: What is Bee tai mak?
Me: Er, Rat’s tail noodles.
LAM: RATS?!?!??!?!

Okay, I think I gave the man a culture shock there and then. But unsavory names aside, the LAM ate and enjoyed the noodles too. He (still) thinks the names we give certain things are a bit weird, but he has assimilated and really, sometimes I think he is more Chinese than I am.

IMG_1471

One of my objectives in writing this blog is to introduce meals that you can cook for your family that can, not only be cooked very quickly, but also cost very little. Hence, this is one of my posts on Feed-4-for-Under-$10 dishes.

And here’s how to cook this dish.

In a heated wok, stir fry minced garlic and finely sliced shallots for about 30 seconds to a minute.

IMG_1379
Once the garlic and shallots at the edges start to brown a little, add the chicken. Stir fry this until the chicken start to turn opaque.
IMG_1382
Add the fish cake and stir to mix.
IMG_1387
Add the vegetables and mushrooms and stir until the vegetables start wilting.
IMG_1391
IMG_1392
At this point, add the bee tai mak, as well as the light and dark soy sauces and pepper.
IMG_1399
Lower the heat and stir, until everything is well-mixed.
IMG_1404
Serve the dish hot, garnished with chopped coriander and sliced chili.
IMG_1427
It is a simple dish, but it is very good. Even the kids like it, so yes, it is definitely a great recipe to turn to when you want something quick and cheap and tasty.

IMG_14271-150x150.jpg
Easy Stir-Fried Bee Tai Mak (老鼠粉) With Chicken And Oyster Mushrooms
IMG_14271-150x150.jpg
  1. 1 piece chicken breast (2 halves), skin removed and sliced thinly
  2. 500g bee tai mak
  3. 3 cloves garlic, minced
  4. 5 shallots, thinly sliced
  5. 2 pieces fish cake, diced
  6. 1 bunch cai sin, or any green leafy vegetables
  7. 1 pack (150g) oyster mushroom, roughly torn
  8. 1 tablespoon light soy sauce
  9. 2-3 tablespoons dark soy sauce
  10. 1/2 teaspoon white pepper
  1. Coriander, chopped
  2. Chili, sliced
  1. 1 tablespoon oyster sauce
  2. 1/2 tablespoon Shaoxing wine
  3. 1/2 teaspoon light soy sauce
  4. 2 teaspoons sesame oil
  5. 1/4 teaspoon white pepper
  1. In a heated wok, stir fry minced garlic and finely sliced shallots for about 30 seconds to a minute.
  2. Once the garlic and shallots at the edges start to brown a little, add the chicken. Stir fry this until the chicken start to turn opaque.
  3. Add the fish cake and stir to mix.
  4. Add the vegetables and mushrooms and stir until the vegetables start wilting.
  5. At this point, add the bee tai mak, as well as the light and dark soy sauces and pepper.
  6. Lower the heat and stir, until everything is well-mixed.
  7. Serve the dish hot, garnished with chopped coriander and sliced chili.
 

edmwrefugee

Alfrescian
Loyal
Sorry. My friend has arrived for our dinner outing. I will continue to post more of my favourite tested recipes later when I get home or tomorrow. :smile:
 

edmwrefugee

Alfrescian
Loyal
Spinach side dish (Sigeumchi-namul) recipe by Maangchi
www.maangchi.com


Sigeumchi-namul is a Korean side dish (banchan) made of blanched spinach seasoned with soy sauce, garlic, and toasted sesame oil. The spinach is only slightly cooked, leaving it a little crispy, but still soft and tasty. Because it’s so easy to make and so delicious, it’s a very popular and common side dish among Koreans. For many Koreans an easy, simple everyday meal consists of rice, kimchi, a stew (often doenjang-jjigae), kongnamul-muchim (a bean sprout side dish), and sigeumchi-namul.

It’s on our everyday table and also served at special occasions, family gatherings, BBQ parties—basically anywhere Koreans are gathering with food, sigeumchi-namul is there and among the most popular dishes, often paired with kongnamul-muchim, another favorite.

In this recipe you can replace spinach with bok choy or arugula or experiment with something new if you want. I had a potluck party with my readers a few years ago, and one of them brought his own sigeumchi-namul made with an ingredient I couldn’t recognize. I asked him and he told me it was tender kale! Blanched and prepared like sigeumchi-namul, it was so delicious!

I hope you enjoy this recipe and the remade HD video. Let me know if you make it. If you try your own experiments, let me know in the comments!

spinach

Ingredients​

Directions​

  1. Boil 8 to 10 cups of water in a large pot.
  2. Blanch the spinach for 30 seconds to 1 minute with lid off, stirring with a wooden spoon.
  3. Strain the spinach and rinse in cold water a couple of times to remove any residual dirt.
  4. Squeeze out excess water and cut a few times into bite size pieces.
    Korean sigeumchi namul (시금치 나물: spinach side dish)
  5. Mix the spinach with garlic, green onion, soy sauce, toasted sesame oil, and sesame seeds in a mixing bowl by hand.
    Korean sigeumchi namul (시금치 나물: spinach side dish)
  6. Transfer to a bowl or plate and garnish with silgochu, if used.
  7. Serve with rice.
Spinach side dish (sigeumchi-namul)
 

edmwrefugee

Alfrescian
Loyal
%EC%8D%B8%EB%84%A4%EC%9D%BC-3.jpg


This is one of my very favourite.

I will make a lot of the paste and store in the freezer. Whenever I have craving for a hot and spicy Sundubu Jjigae, I will go the the supermarket, buy some silky tofu, dig in my freezer, scoop out some paste and make a heart warming spicy tofu soup.

I highly recommend you try this recipe.

For the Korean claypot, you can easily find in those Korean food retail shops throughout Singapore. Buy a big one. No point buying the small one. It's also fine if you don't have it. Just use a cast iron pot. It keeps heat throughout your meal.


edmwrefugee

Alfrescian
Loyal
Thai style Crab Fried Rice - The Woks of Life
thewoksoflife.com

Crab Fried Rice is a classic and much beloved Thai dish, characterized by its delicate flavors. The crab is really the star of the show here, so a light touch is used when it comes to soy sauce, fish sauce, and the shaoxing wine. The cilantro, scallion, and lime combo adds the perfect fresh flavor.

The first time I had this rice was at a Japanese restaurant in Philadelphia. My professor was paying for lunch for a group of students, which means, hey–SPRINGING for the $15 crab fried rice. At first I wasn’t really impressed by it. It was definitely good, but only later when I ate the leftovers with chili oil did I truly appreciate the flavors.

So, as we do with many dishes on this here blog, we definitely recommend liberal amounts of chili oil on the side. You need just enough so it’s spicy and zingy, but the crab remains, well…crabby. And well at the forefront.

Crab Fried Rice, by thewoksoflife.com

Crab Fried Rice Recipe Instructions​

First, prep all of your ingredients, including your aromatics—ginger, garlic, cilantro, and scallions. Prep the beaten eggs as well and set them aside. Only when you have all the ingredients prepared and ready to go should you start cooking.
Heat the cooking oil in a wok over medium-high heat. Add the ginger first, stirring for 30 seconds. Then add the garlic.

Crab Fried Rice, by thewoksoflife.com

When the garlic is just cooked (before it starts to turn golden), add the cooked white rice to the wok, and turn up the heat to high. Stir fry the rice for 3 minutes or so until it’s thoroughly combined with the ginger/garlic mixture and/or warmed through if you’re using leftover rice.

Now for the flavorings: add the white pepper, fish sauce, soy sauce, and Shaoxing wine to the rice. If it’s not quite salty enough for you or if you know you won’t be eating it with added hot sauce, now is the time to add salt to taste. Stir-fry to combine. Using your wok spatula, spread the rice out into an even layer along the surface of the wok. Pour the beaten egg evenly over the rice.

Crab Fried Rice, by thewoksoflife.com

Stir the rice until all of the egg is cooked and incorporated. The egg coats the rice and makes for a most excellent savory experience. Much better than broken up bits/huge chunks of scrambled egg throughout.

Before adding the crab, use your wok spatula to once more spread the rice evenly in the wok. Add the crab to the rice and stir fry thoroughly.

Crab Fried Rice, by thewoksoflife.com

When the crab is warmed through, add the scallion and cilantro and stir-fry briefly until the herbs are just wilted.

Crab Fried Rice, by thewoksoflife.com

Serve your Thai Crab fried rice and finish with a squeeze of lime and your favorite chili oil!

Crab Fried Rice, by thewoksoflife.com

Crab Fried Rice, by thewoksoflife.com

Crab Fried Rice, by thewoksoflife.com

If you’re not crazy about crab fried rice but in still need of a carb fix, then check out our growing collection of rice and noodles recipes.
Looking for more authentic recipes? Subscribe to our email list and be sure to follow us on Pinterest, Facebook, Instagram, and Youtube!

Ingredients​

Instructions​

  • First, prep all of your ingredients, including your aromatics--ginger, garlic, cilantro, and scallion. Prep the beaten eggs as well and set them aside. Only when you have all the ingredients prepared and ready to go should you start cooking.
  • Heat the cooking oil in a wok over medium-high heat. Add the ginger first, stirring for 30 seconds. Then add the garlic. When the garlic is just cooked (before it starts to turn golden), add the cooked rice to the wok, and turn up the heat to high. Stir fry the rice for 3 minutes or so until it's thoroughly combined with the ginger/garlic mixture and/or warmed through if you're using leftover rice.
  • Now for the flavorings: add the white pepper, fish sauce, soy sauce, and shaoxing wine to the rice. If it's not quite salty enough for you or if you know you won't be eating it with added hot sauce, now is the time to add salt to taste. Stir-fry to combine.
  • Using your spatula, spread the rice out into an even layer along the surface of the wok. Pour the beaten egg evenly over the rice. Stir the rice until all of the egg is cooked and incorporated. The egg coats the rice and makes for a most excellent savory experience. Much better than broken up bits/huge chunks of scrambled egg throughout.
  • Before adding the crab, use your spatula to once more spread the rice evenly in the wok. Add the crab to the rice and stir fry thoroughly. When the crab is warmed through, add the scallion and cilantro and stir-fry briefly until the herbs are just wilted. Serve and finish with a squeeze of lime and your favorite chili oil!

nutrition facts​

Calories: 397kcal (20%) Carbohydrates: 47g (16%) Protein: 19g (38%) Fat: 14g (22%) Saturated Fat: 2g (10%) Cholesterol: 137mg (46%) Sodium: 1170mg (49%) Potassium: 312mg (9%) Fiber: 1g (4%) Sugar: 1g (1%) Vitamin A: 245IU (5%) Vitamin C: 3.7mg (4%) Calcium: 93mg (9%) Iron: 1.3mg (7%)


edmwrefugee

Alfrescian
Loyal
If you are too lazy like me to make my own pulled pork, I would recommend you Tulip's frozen Pulled Pork.

Tulip-Pulled-Pork.png


I usually get my supply from Meidi-ya at Millenia.

What I usually do is to throw the whole chunk in the Air Fryer for 20mins at 180℃. Take out from Air Fryer, let it cool and shred it with my hands. Wear disposable gloves.

You can use it to make very nice sandwiches with onions, or whatever crunchy vegetables and LOTS of CHEESE

The only complaint I have with this product is that recent batches are getting a bit salty. It doesn't use to be that salty. Overall, still a good product.
 

edmwrefugee

Alfrescian
Loyal
085605_4010f76c46967c3c06a533bce1a34c3f.jpg


I have tried countless brands and types of supermarket sausages. IMHO, this Pan Pacific Pork Garlic Sausages are the best in town (Singapore). However, it all depends on individual likes and dislikes. It's just my recommendation.

You can get this at Cold Storage or Meidi-ya. The latter sells this cheaper. If I am not wrong, Cold Storage sells this at almost $11. You can easily save $2 off buying from Meidi-ya.

Grill it with lots and lots of onions and herb spices.
 

edmwrefugee

Alfrescian
Loyal
Vege-Jucies-600.jpg

https://www.homegrownjuice.co.nz/

This New Zealand 100% is always my substitute for home made cold pressed juices when I am lazy to put my hands and legs to good use.

Homegrown brand juices came into Singapore's market about a year ago. It used to retail at $9 for two one litre bottles. Now it's $5.95 per one litre bottle.

You can usually get at Cold Storage or Giant. It's usually slightly cheaper in Giant.

It's really good stuff, especially the Raw Energy sku. The beet root is extremely refreshing. The Immunity sku is a bit too sweet for my liking as they added honey. I wish they don't add honey. You can't get the Vital Greens sku in Singapore.

IMHO, this Homegrownjuice beats all those nonsensical juices from Marigold and whatever local brands that you find in the supermarkets.
 

edmwrefugee

Alfrescian
Loyal
bnf-logo

Braised Crab Meat Soup


Although we are non-shark’s fin soup eaters, we are definitely fans of braised crab meat soup. The taste and texture of both soups are pretty similar although the price point is not.

Putting together this hearty soup is not difficult at all, as like the Hot & Sour Soup I shared some time ago.

Bear Naked Food braised crab meat soup

I used frozen crab meat for this recipe and it was very acceptable by all my taste testers. However, if you are an advocate for fresh crab meat, please go ahead to use them. You could also turn this into a braised seafood soup by adding other seafood like diced prawns and scallops.

I got this packet of frozen crab meat from the frozen section in the supermarket.
I got this packet of frozen crab meat from the frozen section within the supermarket.

Ingredients:
100 g Frozen crab meat
2 dried Chinese mushroom – soaked and soften
½ piece bamboo shoot – sliced thinly (optional)
1 small piece (approx. 10 g) ginger – minced
1 egg white – lightly beaten
Stock base:
1 knorr chicken stock cube
2 cup (500 ml) water
1 tbsp oyster sauce
½ tsp knorr chicken seasoning
1 tsp Chinese rice wine (I’m using Shao Tsing Hua Tiao)
½ tsp dark soy sauce
1/8 tsp salt
To thicken:
2 tbsp corn starch
3 tbsp water
Garnish:
Chopped coriander
White pepper
Black vinegar
serves 3 – 4
Recipe adapted from: Knorr

.............

@edmwrefugee suggestions
: If you use fresh crab meat from steamed crabs, it will taste much much better. However, you will need to have time to slaughter, steam and deshell the crabs.
 

edmwrefugee

Alfrescian
Loyal
One of my favourite home cooked Cantonese dish is Har Lok made the traditional way.

This is one of the earliest and more authentic home cooked Cantonese Har Lok video recipe on YouTube.

Every time I need to make a Har Lol dish for my friends or family, I will revisit this video so that I won't forget any ingredients.

 
Last edited:

edmwrefugee

Alfrescian
Loyal
c1c1ea88d4eddb868dbad04cb9fd621c.jpg

I am a sort of a sucker for Japanese instant coffee or coffee powder (I will talk about powder in another post).

This UCC instant coffee is really good. I would rate 114 and charcoal roasted (left most pic and right most pic) as the ones I prefer.

114 is the lightest and taste absolutely aromatic even though it's mild. If you like deeper flavour, then try 117 or 118.

Online Review : "Carefully selected green coffee beans are roasted using the foremost blending expertise to develop this popular and flavorful instant coffee that tastes almost exactly like ground coffee. The Blend 114 is low in acidity and a softer, smoother flavor than the blend 117 that characterizes a rich aroma and a full-bodied flavor."

It's cheaper if you buy in Japan Home than in Don Don Donki, Cold Storage or NTUC finest.

I also add with NZ Otis Oat Milk and it gives the best coffee in mornings.

images


I have tried numerous brands of Oat Milk available in Singapore supermarkets. Otis Oat Milk is still the best and gives my coffee the best outcome.
 
Last edited:

edmwrefugee

Alfrescian
Loyal
The Best Homemade Peanut Butter (With Variations)
www.inspiredtaste.net

Let’s talk about why you need to make peanut butter at home. It’s simple to make plus you can easily add your own creative spin. Below we’ve shared how to make both creamy and crunchy peanut butter as well as an almond and chocolate variation.

Homemade Peanut Butter

It’s So Easy To Make Homemade Peanut Butter!​

I love making my own peanut butter. You have all the control — the amount of salt or honey is up to you. Plus, you can get creative. We make our basic peanut butter crunchy. Sometimes, we add almonds. And when we’re feeling bold, we make chocolate peanut butter. (It is seriously good).

How to Make the Best Homemade Peanut Butter
Are you game for whirling up some peanuts and making your very own peanut butter? You really can make our peanut butter recipe in under 15 minutes. In fact, most of that time is roasting the peanuts.

After roasting, throw peanuts into the bowl of a food processor. Turn on and watch as the peanuts turn into crumbs, then a thick paste, and finally smooth, shiny peanut butter. It’s almost magical.

Here’s what the peanut butter looks like at the beginning of processing. Very crumbly.

Here's what the peanut butter looks like at the beginning of processing. Very crumbly.
After a minute, the peanut butter looks more like a thick paste. It needs more time.

After a minute of processing, the peanut butter looks more like a thick paste.
Then, after a bit more processing the whole mixture just sort of gives up and turns into a silky smooth peanut butter. It’s at this point that you can add sweetness with honey or a little seasoning with salt. For extra smooth peanut butter, you can also add a tiny bit of oil, but that’s completely up to you.

Then, after a bit more processing the whole mixture just sort of gives up and turns into a silky smooth peanut butter.
More nut butter recipes! How to make cashew butter and how to make almond butter

Homemade Almond Peanut Butter​

Now that you are a pro at making basic peanut butter, get creative and play. One of our favorite twists is to use equal parts of peanuts to almonds. By the way, if you only use almonds, you can make almond butter.

The process is the same, roast then add all the nuts to a food processor, turn on and watch the magic happen. Add salt, honey (or maple syrup) as needed then check the consistency — we have found the peanut almond butter needs a little more oil added.
For homemade almond butter, take a look at this recipe. We add a little bit of vanilla and cinnamon and it’s amazing!

Homemade Chocolate Peanut Butter — Pure Joy​

OK, now for my favorite: Chocolate Peanut Butter. Think of it as a peanut-ified Nutella. It’s quick and easy to make. Start with the basic peanut butter then instead of adding honey, add cocoa powder and powdered sugar.

The result? Creamy, chocolaty goodness — we’re absolutely in love with it.

Homemade Chocolate Peanut Butter
(Chocolate and peanut butter has to be one of our favorite combos — see our Easy Bar Cookie Recipe with Peanut Butter Cups or our Chocolate Covered Rice Krispie Treats)

You decide. Basic peanut butter, peanut almond butter, chocolate peanut butter or would you make your version? We want to know. Just leave your response in the comments below.

(If you love peanut butter, try making our peanut butter cookies. They are so easy!)

Recipe updated, originally posted February 2013. Since posting this in 2013, we have tweaked the recipe to be more clear. – Adam and Joanne

The Best Homemade Peanut Butter (With Variations)​

  • PREP 10mins
  • COOK 10mins
  • TOTAL 20mins
This peanut butter recipe is so simple to make — all you need is a food processor and 15 minutes. Plus, you can get creative. We make our basic peanut butter crunchy. Sometimes, we add almonds. And when we’re feeling bold, we make chocolate peanut butter. (It is seriously good). It’s best to start with raw peanuts, however, if you cannot find them, use roasted. Since they’re roasted you could skip roasting in the oven, but we do it anyway — it sort of brings them back to life. Regarding the oil — add as needed. If it seems dry, add a little oil — maybe a teaspoon at a time.
Makes approximately 1 1/4 cups or 20 (1 tablespoon) servings

You Will Need​

Basic Peanut Butter
2 cups (300 grams) unsalted shelled peanuts
Pinch to 1/2 teaspoon sea salt
1 to 2 teaspoons honey
1 to 3 teaspoons peanut or vegetable oil, if needed
Almond Peanut Butter
1 cup (150 grams) unsalted shelled peanuts
1 cup (150 grams) unsalted whole almonds
Pinch to 1/2 teaspoon sea salt
1 to 2 teaspoons honey
1 to 3 teaspoons peanut or vegetable oil, if needed
Chocolate Peanut Butter
2 cups (300 grams) unsalted shelled peanuts
Pinch to 1/2 teaspoon sea salt
2 tablespoons peanut oil or vegetable oil, plus more as needed
1/2 cup (45 grams) unsweetened cocoa powder
1 cup to 1 1/2 cups (170 grams) powdered sugar

Directions​

  • Roast Nuts
  • Heat oven to 350 degrees F. Add the nuts to a round or square cake pan (or rimmed baking sheet).
    Roast nuts for 3 minutes, shake pan then roast another 3 to 5 minutes or until the nuts are lightly browned and smell nutty (careful, they can burn quickly). Let cool until you can handle them.
    • Basic Peanut Butter
    • If you are making crunchy peanut butter, add 1/3 cup of the roasted peanuts to the bowl of a food processor.Pulse 6 to 8 times, or until the peanuts are chopped into very small pieces. Transfer chopped peanuts to a bowl and reserve for later.
      Add the roasted peanuts to the bowl of a food processor. Process 1 minute then scrape sides of the bowl with a rubber spatula. Process another 2 to 3 minutes until the peanut butter is shiny and smooth.
      Add your desired amount of salt and honey then process until combined. (We add 1/2 teaspoon of salt and 1 1/2 teaspoons of honey). Check the consistency, if it seems too thick, add oil, a teaspoon at a time, until you are happy with it. For crunchy peanut butter, stir in the reserved peanuts.
      Peanut Butter Step-1
      • Almond Peanut Butter
      • Add nuts to the bowl of a food processor. Process 1 minute then scrape sides of the bowl with a rubber spatula. Process another 2 to 3 minutes until shiny and smooth.
        Add your desired amount of salt and honey then process until combined. (We add 1/2 teaspoon of salt and 1 1/2 teaspoons of honey). Check the consistency, if it seems too thick or dry, add oil, a teaspoon at a time, until you are happy with it.
        • Chocolate Peanut Butter
        • Add the roasted peanuts to the bowl of a food processor. Process 1 minute then scrape sides of the bowl with a rubber spatula. Process another 2 to 3 minutes until shiny and smooth.
          Add salt, oil, cocoa powder, and the powdered sugar then process another minute until blended and shiny. Check the consistency, if it seems too thick, add oil, a teaspoon at a time, until you are happy with it.

Adam and Joanne's Tips​

  • How to store: Transfer the peanut butter to a food-safe container, cover, and then store in the refrigerator up to one month. If over the month the nut butter separates, use a spoon to stir it until it is well blended.
  • Using a blender: As long as you have a relatively high-powered blender, you can make peanut butter in a blender. The steps will be the same as with a food processor.
  • Nutrition facts: The nutrition facts provided below are estimates and are for the basic recipe. We have used the USDA Supertracker recipe calculator to calculate approximate values.
If you make this recipe, snap a photo and hashtag it #inspiredtaste — We love to see your creations on Instagram and Facebook! Find us: @inspiredtaste

Nutrition Per Serving: Serving Size 1 tablespoon / Calories 95 / Protein 3 g / Carbohydrate 3 g / Dietary Fiber 1 g / Total Sugars 1 g / Total Fat 8 g / Saturated Fat 1 g / Cholesterol 0 mg

AUTHOR: Adam and Joanne Gallagher
 

edmwrefugee

Alfrescian
Loyal
I am usually the sort that cannot decide what I want to eat for meals until the last minute.

For example, out of the blue, I suddenly develop a craving for Malay food. Of course, if my favourite Nasi Padang stalls are still opened, AND IF I AM NOT IN TARDINESS, I will make myself there.

However, sometimes, I just do not want to step out of the comfort of my home.

My fallback plan is always As-Sufi frozen Ready to Eat meats and seafood im my freezer.

As-Sufi do carry a couple of Ready to Eat skus, but my favourite Malay RTEs are these two. Rendang Daging and Sambal Sotong.

as-sufi-rendang-daging-400g.jpg

I have tried various brands like Pondok Abang.. As-Sufi Beef Rendang is still the one that I like. I usually cook some basmati rice to go along with this or I heat up a frozen naan (I will recommend my favourite RTE frozen naan in another post).

WhatsApp-Image-2021-04-06-at-2.36.11-PM.jpeg

As-Sufi Sambal Sotong RTE is also another of my favourite. Extremely delicious with pipping hot basmati rice.

As-Sufi also produces Sambal Udang (picture below) and also chicken RTEs. I haven't try them so I can't give my opinion.
675129936cf5d3cdf25cb2415918e73f


Generally, you won't be able to find these As-Sufi products in NTUC, Cold Storage or Sheng Siong. Sometimes, NTUC will have have, but usually the chicken and the prawn.

So, you either order online or if you prefer, there is a Malay run retail shop at Buangkok or Tampines (details below) that carries all these Malay food products. They also carry other brands like Pondok Abang brands. But my tastebud preference is still As-Sufi.

Suzy Ameer

1585145694285_suzy_ameer.jpg

Credit: Suzy Ameer on Facebook

With two outlets (in Tampines and Buangkok), Suzy Ameer sells a variety of halal frozen meats and a range of other products from instant convenience food to canned food, bread, snacks and more. They even have baking needs, health and household items and baby products!

But what's worth a mention is their extensive variety of halal instant pastes. This is great for those of you who are new to cooking or don't wish to go through the hassle of cooking everything from scratch. Suzy Ameer has its own brand of instant pastes ranging from curry to rendang, mee rebus and lemak cili padi (coconut cream with chilli). But they do stock up on other brands too (from As-Sufi, Dessa, Asyura etc) so you can try a new brand every time you purchase your groceries ?

Craving some BBQ meat while you're home? Suzy Ameer has a whole section on BBQ items and supplies. Look out for marinated wings, satay, lamb rack, lamb shoulder chops and more! Who says you can't have a fancy meal at home??

Website
 

edmwrefugee

Alfrescian
Loyal
This is the RTE Garlic Naan that I talked about earlier. It's made it Pakistan and the brand name is Karachi Delight.

It's cheap and easily available at Sheng Siong. I cant remember the exact price as I just usually take and dump into my the grocery basket.

Karachi Delight also produces other RTE naans. But I still prefer this garlic version. It goes well with beef rendang or sometimes, I would dabao Nana Curry chicken or mutton from Bukit Merah and eat with these naans.

garlic-naan_1024x1024.jpg
 
Top